This chapter contains the following topics:
Entering Multi Payment Receipts
Cash receipts lets you enter into the system the payments you receive from your customers. Cash receipts are first entered and then posted. In between the two, you can print an edit list of cash receipts to verify that your entries are correct before you commit to posting them.
You can also print a worksheet noting how cash received is to be applied; that is, which open items are to be paid.
Returned checks should not be entered as negative receipts; these are handled by a separate selection as discussed in the Returned Checks chapter.
Entry for Cash receipts and Multi-payment Receipts are similar but with some differences. These differences include:
| • | Cash receipts allows entry of cash or a check where multi-payment allows entry of credit cards, cash or check. Each multi-payment type can be assigned to a different cash account. |
| • | Cash receipts allows entry to Open on account where PBS Multi-payment does not. |
| • | Single payment cash receipt payment information is entered on the first tab, where Multi-payment information is entered in a payments window. If processing with a credit card, then another window displays where the credit card information is entered. |
| • | With PBS Multi-payment processing you may enter payment types of cash, check and credit card. When using credit card authorization you will use the credit card processor of X-charge. |
| • | With cash receipts you enter the payment amount on the first screen. With PBS Multi-payment processing you determine the payment amount by the invoices that are applied as paid. |
| • | Multi-payment only functions in graphical mode, where cash receipts allows entry in both character and graphical modes. |
See PBS Multi-payment Setup for the configuration steps.
Cash receipts may be under batch control, and this will require screens not discussed in this chapter. Refer to the Using Batch Controls chapter of the System User documentation for details. Also see Batch controls level in the A/R Control information chapter.
Select
Enter from the Cash receipts menu.
Graphical Mode
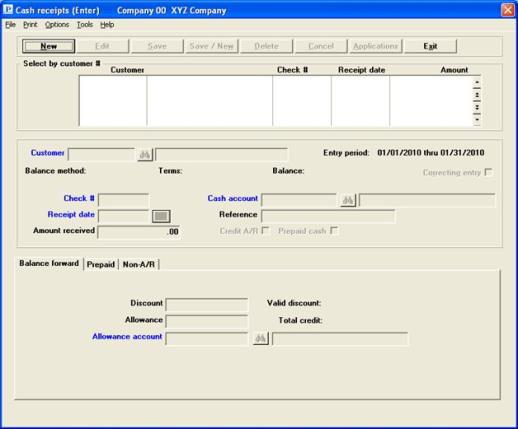
The following screen appears:

From this screen you can work with both new and existing cash receipts.
Up to 6 existing cash receipts display in the list box. You may sort the cash receipts by customer number in ascending or descending order. Only column names in red may be sorted. To select or change the sort field, click on the column name or the arrow to the right of the column name or use the View options.
To locate a cash receipt, start typing the customer number or use the arrow keys, <PgDn>/<PgUp>, and <Home>/<End> keys to find the customer. The <F1> and <SF1> keys function the same as the up/down arrow keys.
Cash receipts that display in the list box are available for changes or deletion. The fields for the selected cash receipt display in the lower part of the screen.
When a cash receipt is found, you may select the <Enter> key or Edit button to start editing.
You have the following options with the buttons and keyboard equivalents:
| Button | Keyboard | Description |
|---|---|---|
|
Alt+n |
For entering a new cash receipt. |
|
|
Alt+e |
For editing an existing cash receipt. |
|
|
Alt+s |
For saving the addition of the new cash receipt or for saving the changes to an existing cash receipt. |
|
|
Alt+w |
This is a combination of the Save and New buttons. |
|
|
Alt+d |
To delete a cash receipt. |
|
|
Alt+c |
To cancel adding or editing a cash receipt. Your entries will not be saved. |
|
|
Alt+a |
To enter edit or delete invoices for an existing cash receipt. Read more about this in the A/R Cash-Balance Forward Customer section. |
|
|
Alt+x |
To exit the cash receipt window. |
Menu Selections
For general users, the menu selections can and may be restricted by the assigned menu. Also, if Order Entry is not licensed or not installed then the Order Entry menu selections will not be available for any user.
From the Print menu you may select Edit list. See Edit List of Receipts for more information.
From the Options menu you may View batch information if batches are being used in A/R and Post cash receipts if you have permission to post. See Posting Receipts for more information.
Other Options menu selections include:
| Options main menu selection | Sub menu selection | Documentation |
|---|---|---|
|
View accounts receivable |
Customers open items |
|
|
View accounts receivable |
Invoices |
|
|
View accounts receivable |
Invoice history |
|
|
View accounts receivable |
Customer history by date |
|
|
View accounts receivable |
Customer history by doc # |
|
|
View order entry |
Orders |
See O/E user documentation |
|
View order entry |
Full order inquiry |
See O/E user documentation |
|
View order entry |
Orders for an item |
See O/E user documentation |
|
View order entry |
Invoice history by customer |
See O/E user documentation |
|
View order entry |
Invoice history by invoice |
See O/E user documentation |
|
View order entry |
Invoice history by item |
See O/E user documentation |
Character Mode
The following screen appears:
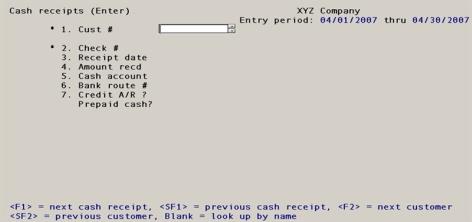
From this screen you can work with both new and existing cash receipts.
If you are using date controls, the date range (from Control information) displays in the upper right. The receipt date is controlled by this function.
Enter the following information:
Options
This is the number of the customer making the payment Enter a valid customer, or use one of the following options:
|
<F1> |
For the next cash receipt entry on file - character mode only |
|
<SF1> |
For the previous cash receipt entry - character mode only |
|
<F2> |
For the next customer in customer number sequence |
|
<SF2> |
For the previous customer |
|
Blank |
To look up the customer by name rather than by number |
The lookup has several options. These options are available as buttons. Some of them are available from the lookup Options menu. Here is an example of the lookup:
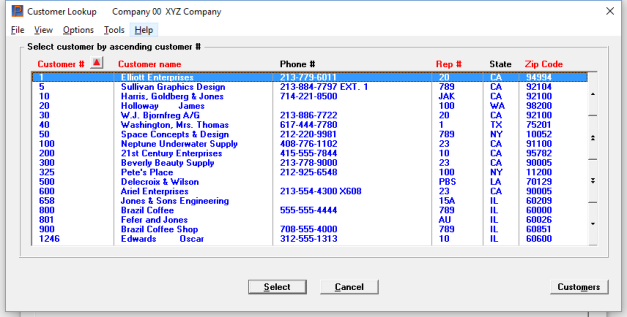
The lookup options include:
Select
This returns the customer to the customer number (and name) field.
Cancel
This puts the focus back to the screen without returning an customer number.
Customers
This button allows you to go to the Customers (Enter) where you may view, edit, add or delete customers. If the button is grayed out you do not have permission to access Customers (Enter).
Miscellaneous Customers
Cash receipts from miscellaneous customers are allowed (these customers have numbers beginning with an asterisk and have been described in the Miscellaneous customers section of the Customers chapter). However, you cannot reach such a customer by the option keys; you must enter the number of a valid miscellaneous customer directly into the customer number field. The cursor then moves to the name field (since both the name and the number of miscellaneous customers must be entered whenever they are referenced).
|
Format |
12 characters |
|
Example |
Type 200 |
Options
If you have left the customer number blank, the cursor will move to the name field to permit selection by customer name. Remember that lower-case letters are significant. Enter the customer name, or the leading characters of the name; or use one of the following options:
|
<F2> |
For the next customer on file, in customer name sequence |
|
<SF2> |
For the previous customer |
|
Blank |
To revert to selecting the customer by his number |
|
Format |
25 characters |
|
Example |
(Does not occur in this example because you have already selected the customer by number.) |
Upon selection of a valid customer (by either method), his name appears next to the customer number, and his balance type and terms also display.
Options
Enter the check number, or use one of the options:
|
<F1> |
For the next cash receipt entry on file for this customer |
|
<SF1> |
For the previous entry |
|
<F2> |
For the check number previously present in this field. This option is only available when changing a new entry from Field number to change ? |
If you leave this field blank, payment is assumed to be in cash, so Cash displays in this field.
|
Format |
8 characters |
|
Example |
Type 348 |
This is the date on which the payment was received. It will be used for G/L distributions.
|
Format |
MMDDYY The default is the same date entered on the previous receipt (except for the first cash receipt of the session, when the default is the system date) |
|
Example |
Type 31205 |
You may be warned or stopped against entering a date that is outside the allowed date range. For more information, read about Date Control in the Control information chapter.
The check or cash can be applied to multiple open items for an open item customer.
Enter the amount of the check or cash received.
|
Format |
999,999,999,999.99- However, if you are interfaced to Job Cost the largest amount that can be distributed to any one cost item is 999,999,999.99- |
|
Example |
Type 1500 |
Options
Enter the cash account number, which must be a valid entry in the Cash accounts selection of the System Manager (Ctl) module. You may use one of the options:
|
<F1> |
For the next cash account on file |
|
<SF1> |
For the previous cash account |
|
<F2> |
For the default cash account from Control information |
If only one cash account is defined, the <F1> and <SF1> options do not appear.
|
Format |
Your standard account number format as defined in |
|
Example |
Press <F2> |
If you have entered no check number in the check number field, this field displays as Reference and you may enter any reference note that you want to add. The reference will be printed on A/R statements if you selected Format 2 statements in Control information.
Options
Otherwise, enter the bank route number or use the option:
|
<F2> |
Customer name |
In all cases the field is optional.
|
Format |
25 characters |
|
Example |
Type 125-6992 |
Leave this field checked if the cash received is to be applied to the customer’s account to pay off open receivables already on account.
Uncheck the field if the cash received is non-A/R cash and is to be posted to other General Ledger accounts (which you will be asked to enter) or if it is a prepayment.
A cash sale may not be applied to accounts receivable. Instead, it would be non-A/R cash and go directly to the appropriate revenue account.
The option to enter prepayments depends on the Prepaid cash setting in the A/R Control information Process prepaid cash field.
|
Format |
Check box, checked is yes and unchecked is no. The default is checked. |
|
Example |
Leave it checked |
A prepaid cash receipt may be entered here and applied later to A/R invoices, O/E orders, O/E select for billing orders and O/E invoices. This field can only be entered if you selected to Process prepaid cash in the A/R Control information.
If you left the Credit A/R field checked, then this field is skipped and is automatically left unchecked.
|
Note |
In order to use this feature in O/E you must also set up O/E Control information field Post cash receipts for. Two of the options allow prepaids to be assigned to orders/invoices. |
Check this box (yes) if the cash received is to be applied as a prepaid cash amount. There is a default liability account as defined in A/R Control information which all prepaid cash deposits will be applied.
Leave this box unchecked (no) if the cash received is non-A/R cash and is to be posted to General Ledger accounts of your choosing. See Non-A/R Cash (Open Item or Balance Forward) for more information.
You may not apply a prepaid cash receipt to a balance forward customer.
|
Format |
Graphical: Check box, checked is yes and unchecked is no. Character: Y or N |
|
Example |
Not enterable because the entry from the previous will not allow it. |
Once you have selected Y to apply the payment as prepaid cash, then the prepaid cash account and amount displays on the screen. The following question also displays:
Are you sure you want to apply this cash as prepaid?
Select Yes to apply the cash as prepaid or select No to return to the Credit A/R field.
|
Format |
Yes/No window |
This type of cash receipt produces a non-A/R prepaid cash transaction (N type) in open items. For a description of all the possible open items types, see the View Customers section of the View chapter.
Options
Make any needed changes, or use one of the options:
|
<F3> |
To delete this cash receipt entry (only available when changing an existing cash receipt) |
|
<F5> |
To identify this as a correcting entry. Pressing <F5> again turns off the correcting entry status. This feature is only present if you are interfaced to the Passport Business Solutions General Ledger and have specified it in G/L Control information. |
When you are in add mode and press <Enter> with this field blank, three different things may happen depending upon the answer to the Credit A/R field and upon the balance type of the customer:
|
Non - A/R Cash |
A/R cash |
|
|
|
Open item |
Balance Forward |
|
Go to: |
Go to: |
Go to: |
There are two possible types of application of Non-A/R cash. One is a prepayment which was explained earlier in the document.
The second type does not create an entry in open items. It is explained here.
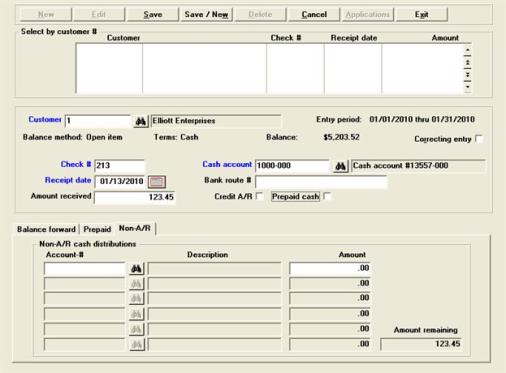
Graphical Mode
The screen appears as follows:
Character Mode
The screen appears as follows:
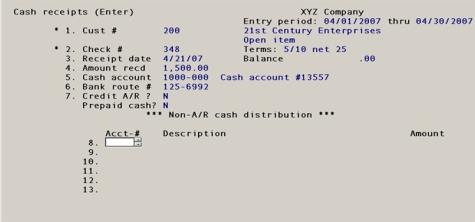
Non-A/R cash distribution
These fields constitute a table, allowing you to distribute the check to as many as six accounts.
All six rows are entered identically; each column is described separately below.
| • | When in add mode: to terminate processing after entering fewer than six accounts, press <Esc> with the cursor in the leftmost column. You will only be allowed to do this if the entire amount of the check has been distributed. |
| • | When in change mode: you will not be able to save the entry until the entire amount of the check has been distributed. |
In both add mode and change mode, the amount remaining to be distributed displays on the screen.
Enter the account number to which this amount is to be distributed.
|
Format |
Your standard account number format, as defined in |
|
Example |
Enter account 4040-000 |
Options
Enter the amount to distribute to the account, or use the option:
|
<F2> |
To distribute the entire amount remaining to this account |
|
Format |
999,999,999,999.99- |
|
Example |
Press <F2> to distribute the entire amount to this account. |
Make any needed changes. If this is an existing entry, you may correct any fields except Customer and Check #. If this is a new entry, you may only correct the distribution fields (you have already had an opportunity to correct fields above the tab.
Options
You may also use the option:
|
<F5> |
For a correcting entry (if specified in G/L) |
Upon pressing <Enter> with this field blank and with no amount remaining to distribute, the screen clears to allow entry of another cash receipt.
Graphical Screen
Enter a balance forward customer (#300) by filling in the first seven fields as shown on this screen:
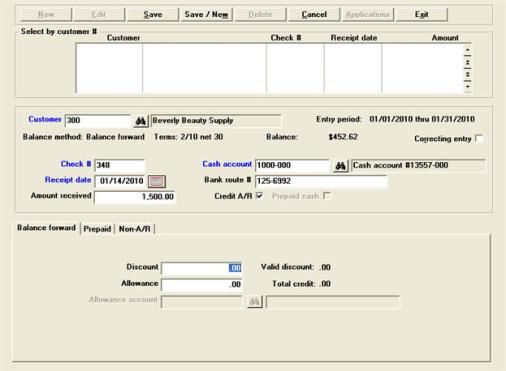
The remaining fields are on the Balance forward tab.
Character Screen
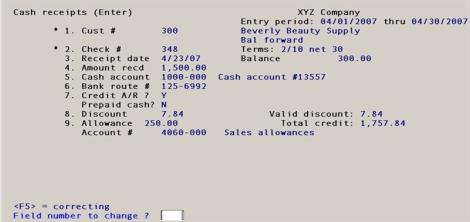
Having entered one cash receipt for non-A/R cash, enter a second one for a balance forward customer (# 300) by filling in Fields #1 through #7 as shown on the following screen:
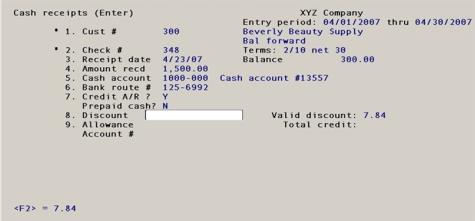
Enter the following information:
Enter the discount amount.
Since this is a balance forward customer, the discount taken is not broken down by invoice, but entered as one discount figure for the entire cash receipt.
The customer may be entitled to a discount for timely payment according to the terms of the invoice. Any such discount is calculated and displayed as Valid discount. You may however enter any other figure. This discount is in addition to any discount which may have applied to the invoice as a whole, or to any of its line items, at the time of billing.
Options
Enter the discount amount (not percent), if any; or use the option:
|
<F2> |
For the valid discount displayed. This option only appears if such a discount is present. |
|
Format |
999,999,999,999.99- |
|
Example |
Press <Enter> |
After this field is entered, the Total credit is displayed.
An allowance is a price reduction given to a customer. For example, minor damage to a product could be compensated by an allowance.
|
Format |
999,999,999,999.99- |
|
Example |
Type 250 |
If you are interfaced to J/C and you enter an amount greater than 999,999,999.99, you will be warned that the allowance distributed to any one cost item is restricted to that amount
Upon entry of an allowance, the Total credit displayed is updated; this is the sum of the check amount, the discount, and the allowance.
If the allowance amount is zero, this field may not be entered.
Options
Otherwise, enter the account number to which the allowance is to be posted, or use the option:
|
<F2> |
For the default allowance account from Control information |
|
Format |
Your standard account number format, as defined in |
|
Example |
Enter account 4060-000 |
Graphical Mode
The screen now appears as follows:
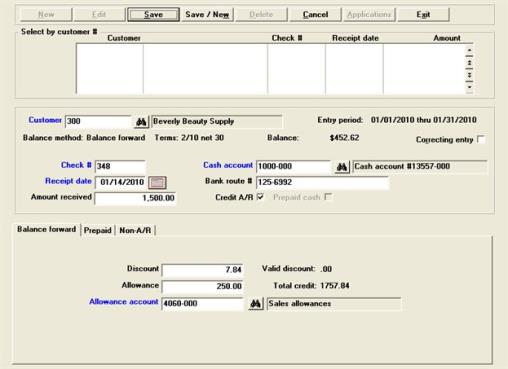
Make any needed changes. Only fields on the Balance forward tab may be changed, for both new or existing entries.
Character Mode
The screen now appears as follows:
Options
You may make changes to fields 3 through 9. You may also use one of the options:
|
<F3> |
To delete this entry (if this is an existing entry) |
|
<F5> |
For a correcting entry (if specified in G/L) |
Upon pressing <Enter> with this field blank, continue processing.
Having entered one cash receipt for non-A/R cash and another for a balance forward customer, enter a third receipt for an open item customer (# 200) by filling in the fields as shown on the following screen:
Graphical Mode
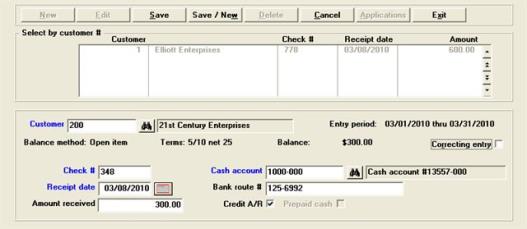
Select the Save button and the "Do you want to automatically apply this payment?" window displays.
Character Mode
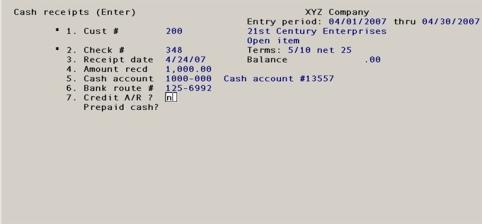
If you select a Yes response to Credit A/R, you are asked: Do you want to automatically apply this payment?:
| • | Answer No in order to apply the payment manually. Cash receipts are not automatically applied to jobs, so if you are using the Passport Business Solutions Job Cost module and you want to apply this payment to jobs, you should answer No. |
| • | Answer Yes to apply the payment automatically. |
|
Format |
Yes/No Question window |
|
Example |
Answer No |
Automatic application
If you chose above to apply this check automatically, as many open items as possible are automatically paid off, taking all valid discounts fully and assuming no allowances. The open items are paid in order by their apply-to number.
If the check amount (plus discounts) is not enough to pay all open items, a partial payment will be made against the final open item to be processed.
If there is an amount left over after all open items for the customer have been paid, this amount will be applied as an open credit. Once the automatic application of cash is complete, the Cash receipts screen is again displayed.
If you choose not to apply this check automatically, you must apply it manually.
For manual application using graphical mode see Graphical Mode Cash Application.
For manual application using character mode see Character Mode Cash Application
After selecting the save button the Cash applications screen display enabling you to apply the cash receipt amount to selected open items.
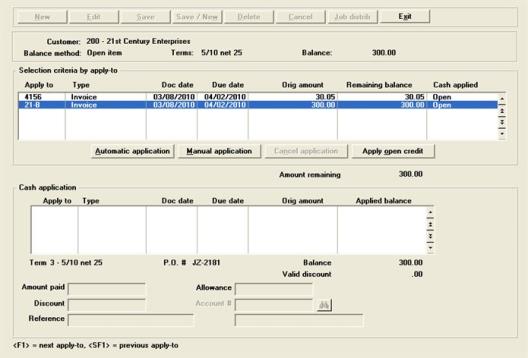
Up to 6 existing open invoices display in the upper list box. You may sort the open invoices by apply-to number in ascending or descending order. Click the arrow to the right of the column name to change the sort or use the View menu options. Only Red fields may be sorted.
To locate a open invoice, you may start typing the apply-to number. Use may also use the up/down arrows, Page up, Page down, Home and End keys to locate the open invoices.
The lower list box can display up to 6 applied invoices. You may sort the applied invoices by apply-to number in ascending or descending order.
You may select the Automatic application button to apply the selected invoice automatically. The amount remaining field will decrease by the amount of the transaction that you are applying.
You may select the Manual application button to apply a partial amount to the selected invoice. When you select Manual application, then the cursor moves to the Amount paid field.
You may also select the Apply open credit button and the amount will post to the open items as Open credit on account.
Enter the amount to be paid on the open item, or use the following option:
|
<F2> |
To calculate the amount automatically, taking any valid discount for this item but not entering any allowance. If the amount is insufficient to pay the item in full, it is paid in part. A partially-paid item is not discounted. |
|
Format |
999,999,999,999.99- |
|
Example |
Press <Enter> |
If you pressed <F2> in the previous field, the discount is applied automatically and the cursor does not move to this field. Otherwise, enter the discount to take on the open item.
|
Format |
999,999,999,999.99- |
|
Example |
Not applicable in this example. |
You may enter a reference for this cash application. This reference will appear on the customer’s statement if you are using Format 2 statements.
|
Format |
25 characters |
|
Example |
Press <Enter> to leave the reference blank. |
If you pressed <F2> in the Amount paid field, a zero allowance is assumed and the cursor does not move to this field. Otherwise, enter the allowance as described.
|
Format |
999,999,999,999.99- |
|
Example |
Not applicable in this example. |
If you entered an allowance amount, then you must enter the account for the allowance.
|
Format |
Your standard account number format, as defined in |
|
Example |
Not applicable in this example. |
You may cancel any application that has been applied. As soon as the application is canceled, then the Amount remaining field will increase by the amount that was canceled.
Select the exit button to when finished applying the cash receipt. If the amount remaining is not zero, then the message "An amount remains to distribute - do you want to delete the entire entry ?". If you select yes, then the cash receipt is deleted. If you select No, then you can return to the screen to complete the cash applications.
Amount Remaining
When the amount remaining is zero, you may exit the screen. If you are interfaced with Job Cost, then the question "Distribute to jobs ? displays. Select Yes to distribute to a job or No to complete the application.

If you enter Y response to Credit A/R, you are asked: Do you wish to automatically apply this payment ?.
| • | Enter N in order to apply the payment manually. Cash receipts are not automatically applied to jobs, so if you are using the PBS Job Cost module and you want to apply this payment to jobs, you should answer No. |
| • | Enter Y to apply the payment automatically. |
There are two application methods:
| • | Single entry application. This method allows you to view one invoice at a time as you apply them to the cash receipt. This is the default method. Use this method if you need to change the discount, allowance, allowance account number or enter a reference. You must use this method if you are interfaced to Job Cost and you want to apply invoices to jobs. For applying invoices to jobs see Applying the Payment to Jobs. |
| • | Multi-line application. This allow you to view multiple lines of invoices as you apply them to the cash receipt. To switch to the multi-line entry select the <F3> key. You cannot change the discount, allowance, account number or enter a reference using this method. See Multi-line Application. |
The bottom half of the screen is displayed to enable you to apply the cash receipt amount to selected open items. The screen also shows the Amount remaining (the remaining, unapplied, portion of the cash receipt).
The following screen appears:
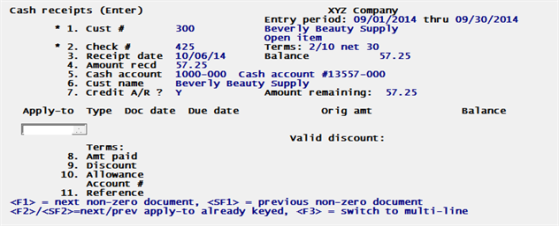
As the same check can apply to more than one document, Fields #8 through #11 may be entered repetitively, once for each document that the check applies to. The Amount remaining is displayed continuously.
Enter the following information:
Apply-to
this field is only available in character mode. Using graphical mode enter the apply to number in the list box.
Enter the number of the document (typically an invoice) to which payment is to be applied (in whole or in part). The document must have already been posted and must be present in A/R Open Items. The displayed balance reflects any posted or unposted payments made on this item. You may also use the following options:
|
<F1> |
For the next open item with a non-zero balance for this customer, in order by apply-to number. You may then enter the amount you want to pay, or press <Esc> to not pay this item. |
|
<SF1> |
For the previous open item |
|
<F2> |
For the next cash applications for the this receipt. Use this to retrace your steps after using <SF2>. |
|
<SF2> |
For the previously entered cash applications for this receipt. This lets you return to applications already entered and correct them from Field number to change ?. |
| <F3> | To switch to multi-line entry |
|
Blank |
To apply the remaining amount as an open credit. Open credit on account is then displayed. You can apply this open credit at a later time; refer to the Applying Open Credit section. |
|
<Esc> |
To terminate distributing the cash receipt, and continue processing. This option is only available if the amount remaining to distribute is zero, unless you wish to cancel the entire entry. |
|
Format |
8 characters |
|
Example |
Type 106 |
8. Amt paid
Enter the amount to be paid on the open item, or use the following option:
|
<F2> |
To calculate the amount automatically, taking any valid discount for this item but not entering any allowance. If the amount is insufficient to pay the item in full, it is paid in part. A partially-paid item is not discounted. |
|
Format |
999,999,999,999.99- |
|
Example |
Press <Enter> |
9. Discount
If you pressed <F2> in the previous field, the discount is applied automatically and the cursor does not move to this field. Otherwise, enter the discount to take on the open item.
|
Format |
999,999,999,999.99- |
|
Example |
Not applicable in this example. |
10. Allowance
If you pressed <F2> in the Amount paid field, a zero allowance is assumed and the cursor does not move to this field. Otherwise, enter the allowance as described.
|
Format |
999,999,999,999.99- |
|
Example |
Not applicable in this example. |
Account #
If you entered an allowance amount, then you must enter the account for the allowance.
|
Format |
Your standard account number format, as defined in |
|
Example |
Not applicable in this example. |
11. Reference
You may enter a reference for this cash application. This reference will appear on the customer’s statement if you are using Format 2 statements.
|
Format |
25 characters |
|
Example |
Press <Enter> to leave the reference blank. |
The character screen should now appear as follows:
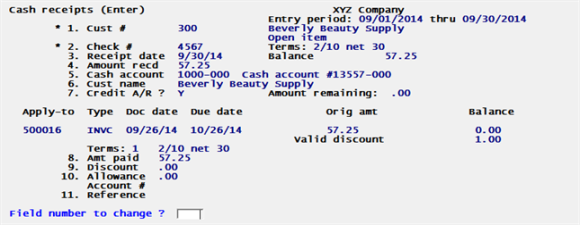
Make any needed changes, then press <Enter> to continue.
After selecting <F3> the multi-line entry screen displays:
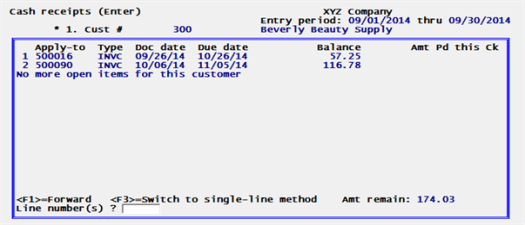
Use this entry screen to apply one or multiple invoices to your payment. You cannot change the discount, allowance, allowance account or reference on this screen. You may use this screen if you are interfaced to Job Cost, however you cannot apply invoices to jobs using this screen.
You may view up to 15 invoices for the selected customer. If there are more than 15 invoices for this customer, select the <F1> key to view the others. Selecting the <F1> key from a second set of invoices will cycle back to the first set.
The first column, on the left, contains a line number for each invoice. Use the line numbers for applying invoices to the payment.
Line number (s)
Enter a line number or a range of line numbers to apply to the cash receipt. Use a dash between each number.
In the example above, a range of 1-2 was entered. Both the first and second line are applied automatically. After applying these invoices the screen is like this:
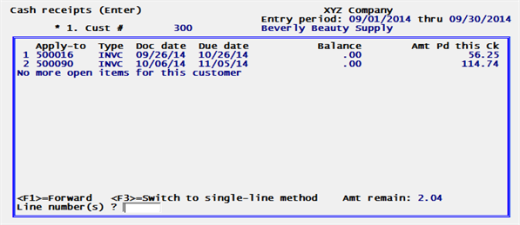
The Balance column now has zero amounts and the Amt Pd this ck column has changed from blank to the applied amount.
If there is no amount remaining to apply, select the Enter key to save the application.
Notice that in the example above there is an amount remaining of 2.04 and there are no more invoices. When there is an amount remaining, after selecting the Enter key, this field displays:
Apply balance as open credit ?
Select Y to apply as open credit to N to not.
When you select Y the program switches the screen back to single line entry where you can apply the balance as an open credit on account. Selecting N keeps you on the multi-line entry screen where you can apply the amount remaining to other invoices, if they exist.
New entries
You may only change the Amount paid through the Reference fields (you have already had an opportunity to correct the Receipt date through Bank route # after entering Credit A/R and Prepaid cash if being used).
When you press <Enter> you are returned to the Apply-to to enter another distribution:
| • | You may enter as many distributions as required, in any order. |
| • | To delete a distribution after having entered it, set its amount to zero. |
| • | You may continue entering distributions after the amount remaining to distribute is zero or negative. |
| • | Terminate entering distributions by pressing <Esc> from the Apply-to field. You can only do this when the amount remaining to distribute is zero (unless you wish to cancel the entire entry). |
Existing entries
Only the first seven fields display initially. You may change any field except Customer, Check #, Credit A/R and Prepaid cash (if being used).
After making all changes and pressing <Enter>, you are asked, Any change to application of cash ?. If you answer Y, the remainder of the screen displays. This also happens unconditionally if you changed the Amount recd field. You can then change, add, or delete distributions in the same way as you do for a new entry. The distributions appear in the same order in which they were entered, except that open credit on account, if present, is always the first distribution. If interfaced to J/C, each application of cash may in turn have been distributed to one or more jobs, and these also can be added, changed, or deleted.
Press <Enter> from a blank Field number to change ?. The cursor will move to the Apply-to field. You can then apply the remainder of a check to another open item.
| • | If you are using the Passport Business Solutions Job Cost module, we will consider that one example is enough and will apply the remainder of the check to a job instead. Press <Enter> with the Apply-to field blank, then press <Esc>. You will be asked Distribute to jobs ?. Answer Y. |
| • | If you are not using the Passport Business Solutions Job Cost module, press <Enter> with the Apply-to field blank, then apply the remaining $124.65 as follows: |
Press <Esc> to exit from this cash application.
Practice
For further practice, and to provide test data for examples in a subsequent selection (Change apply-to number or due date), enter another cash receipt as follows:
|
Field |
Contents |
|
Customer |
100 |
|
Check # |
201 |
|
Receipt date |
03/10/97 |
|
Amount received |
140.00 |
|
Cash account |
1000-000 |
|
Reference/ Bank route # |
125-6992 |
|
Credit A/R |
Yes |
| Button row | Save |
|
Do you wish to automatically apply this payment ? |
Select No |
|
Apply-to window |
Select the Open credit button to apply the $140.00 as an open credit on account. |
|
Save |
Select the Save button to save the record |
|
Note |
If you are not using Job Cost, skip to the Applying Open Credit |
Graphical Mode
After entering each cash application except open credit on account, you may select the Job distrib button to display the Job Distributions window. When you do the following window displays:
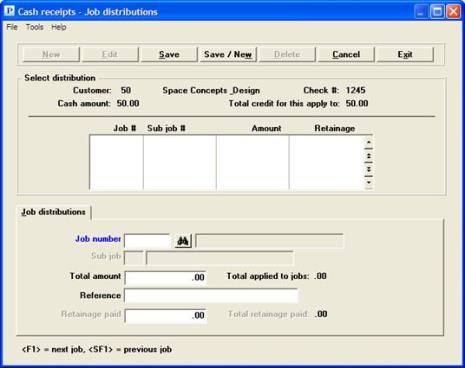
At the Job number field enter a job.
Character Mode
If you do not have to apply the invoices to a job you may switch to the multi-line application screen by selecting <F3> from Field number to change. If you so see Multi-line Application.
After entering each cash application except open credit on account, you are asked either Distribute to jobs ? (for a new application) or Add or change job distributions ? (for an existing application).
Answer N if no part of this cash application is to be applied as payment to any job.
Answer Y if all or part of this application is payment for one or more jobs (or sub-jobs).
The amount applied to any job or sub-job may be more or less than the payable amount expected by Job Cost.
The total amount applied to all jobs may be less than, but cannot be more than, the amount of this cash application.
If you answer Y, the following screen appears. This screen appears automatically if this is an existing application and you have changed Field #8, 9, or 10.
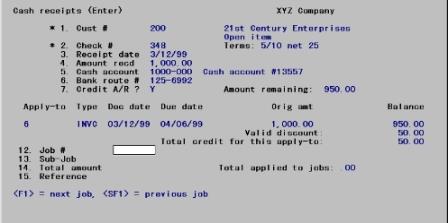
Fields #12 through 16 are entered repetitively until this application has been distributed to all desired jobs.
Enter the following information:
The job you wish to apply this payment to must be on file and its status must be either active or closed. Enter the number of the job, or use one of the options:
|
<F1> |
For the next active or closed job on file in Job Cost (if this is a new cash application) For the next job distribution on file for this cash application (if this is an existing cash application) |
|
<SF1> |
For the previous job (if this is a new application) For the previous job distribution (if this is an existing application) |
|
<Esc> |
To terminate entering job distributions for this cash application |
|
Format |
7 characters |
|
Example |
(Does not appear in this example because you are not interfaced to J/C.) |
If the job does not have sub-jobs, or it has sub-jobs but does not allow billings for sub-jobs, this field is grayed-out and the cursor does not move to it.
Otherwise, enter the sub-job number that the payment is being applied to. The sub-job must be on file for the job.
|
Format |
999 |
|
Example |
(Does not appear in this example because you are not interfaced to J/C.) |
Enter the total amount being applied to this job, or use the option:
|
<F2> |
For the credit amount remaining for this cash application |
|
Format |
999,999,999.99- |
|
Example |
(Does not appear in this example because you are not interfaced to J/C.) |
Enter a reference for this payment for the job. This field is optional
|
Format |
25 characters |
|
Example |
(Does not appear in this example because you are not interfaced to J/C.) |
This field can only be entered if you answered Y to Use retainage receivable ? in J/C Control information. This feature applies primarily to the construction industry.
Enter the amount of retainage being paid with this payment. It cannot exceed the total amount entered in the Total amount field.
|
Format |
999,999,999.99- |
|
Example |
(Does not appear in this example because you are not interfaced to J/C.) |
Make any needed changes.
Select the Save button to save the record or Save/New to save the record and begin entering a new one. When selecting to start a new record the cursor moves back to the Job number field.
If you select the Edit button you may only edit the Total amount, Reference and Retainage paid fields (Retainage may not be available on your system).
Open Credit (sometimes called unapplied cash) is cash previously received and entered in the Enter selection, but not applied to any open item — either because the customer overpaid, or because you have not yet worked out which item it should apply to.
The Cash Application Worksheet is often useful in solving knotty cash application problems.
There are two ways to apply an open credit:
| • | Bring up the open credit using the Change apply-to number or due date selection, and change its apply-to number to the number of the open item you want to pay. This method (which incidentally lets you apply open credit to only one open item) is not discussed further here. See the Change Apply-to Number or Due Date chapter. |
| • | The second method makes use of this Cash receipts selection, and lets you apply open credit to many open items. This method takes advantage of the fact that an open credit entry is an existing entry of the Cash receipts selection, just like any other cash receipt, and merely has to be identified in order to be changed. |
To identify the credit, supply the following in the Enter screen:
|
Field |
Contents |
|
|
Character field number |
Field name |
|
|
1. |
Customer |
Customer’s number |
|
2. |
Check # |
Original check number (blank if currency) |
|
3. |
Receipt date |
Original receipt date |
|
4. |
Amount received |
0 (the amount is not part of the identification; this field will display the correct amount received as soon as the entry is identified.) |
|
5. |
Cash account |
Cash account used originally for open credit |
|
6. |
Bank route # (or Reference) |
Any value is accepted as this field does not form part of the identification key. |
|
7. |
Credit A/R |
Checked |
From this point it differs depending on if Graphical mode or Character Mode.
Graphical Mode
Click the Apply open credit button (or select Alt+o) and do the following:
| • | Enter the negative amount that you want to use for open credit. |
| • | Select the Save button (or type Alt+s). |
| • | Highlight the open item you want to apply it to. |
| • | Select either the Automatic application (Alt+a) or Manual application (Alt+m) payment button. |
| • | Enter the positive amount of the open credit that you want to apply. |
| • | Select the Save button (or type Alt+s). |
Character Mode
Then press <Enter> in the Apply-to number field. Open credit on account will display. Enter the amount of open credit you wish to apply as the Amt paid. Enter this as a negative amount. This amount will be deducted from existing open credit, thus making it available for application to open items. The Amount remaining shown on the screen will now be equal to the amount of open credit that can be applied.
Enter zero for the discount amount and allowance amount. An entry for the Reference is optional. Press <Enter> at Field number to change ? and you will be returned to the Apply-to number field.
You may apply the open credit amount to the desired open items just as if you had entered the amount of open credit as a new cash receipt.
G/L distributions will be created when the transaction is posted. However, there is no change to the customer’s A/R account or the cash account as a result of the above.
If you print the Distribution to G/L Report, you will observe that the negative entry resulted in a credit to the cash account and a debit to the A/R account. Entry of the applications of the open credits results in a debit to the cash account and a credit to the A/R account.
There is no net change to the G/L accounts because these amounts are equal, If, however, you view the open items for the customer, you will observe that the open credit has been reduced by the amount applied to specific open items.
If you have received a payment from a customer and wish to apply this payment along with open credit, enter the cash receipt as you would normally, but prior to applying the amount of the cash receipt. Press <Enter> for the Apply-to number, and enter a negative amount, as described above, for the amount of open credit to be applied. Then apply both the cash receipt amount and the open credit amount to the open items desired.
|
Note |
If you like you may use the pre-paid cash feature. This allows you to enter pre-paid cash. Later you may apply this cash to an invoice in A/R or order/invoice in O/E as they are being entered. This would eliminate the step of applying the cash later. See the Process prepaid cash field in the Control information chapter. |
You must have a PBS License (RW.LIC) file that includes the credit card software subscription in order to use the PBS Multi-payment features. See the PBS Multi-payment Setup appendix for set up instructions.
The cash receipts multi-payment feature allows you to apply one or more payments to multiple invoices. Multiple payment types of cash, check, and credit card(s) are supported. Each payment code can be assigned to a different cash account.
It allows the entry of multiple payment types for each application. Here are some examples of how this is useful:
| • | A customer has sent you a check, but it is short on fully paying the invoice(s). You may call the customer and ask for a credit card to handle the remainder of the payment. Both of these payments can be applied to one set of open invoices. Each payment used for a transaction posts to open items as a separate P type (payment). |
| • | You receive a credit card payment but you want to apply it to two different cash accounts. As long as there are two pay codes, each with a different cash account, you may do this. |
Select
Multi payment receipts from the Cash receipts menu.
Graphical Mode
The following screen appears:
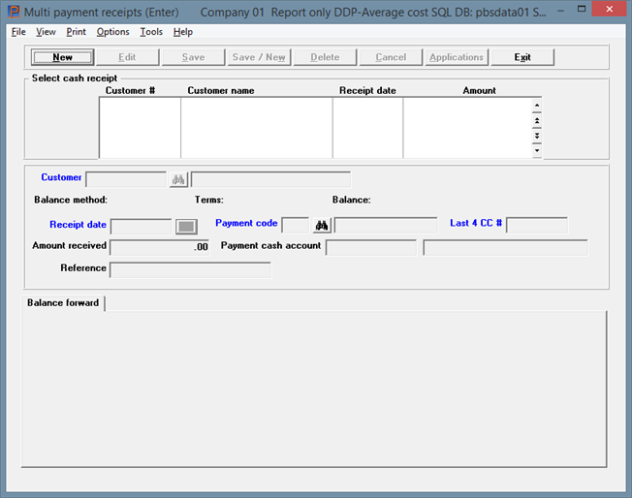
From this screen you can work with both new and existing multi payment receipts.
Multi-Payment Receipts List Box
Up to 6 existing cash receipts display in the list box. You may sort the cash receipts by customer number in ascending or descending order. Only column names in red may be sorted. To select or change the sort field, click on the column name or the arrow to the right of the column name or use the View options.
To locate a cash receipt, start typing the customer number or use the arrow keys, <PgDn>/<PgUp>, and <Home>/<End> keys to find the customer. The <F1> and <SF1> keys function the same as the up/down arrow keys.
Cash receipts that display in the list box are available for changes or deletion. The fields for the selected cash receipt display in the lower part of the screen.
When a cash receipt is found, you may select the <Enter> key or Edit button to start editing.
You have the following options with the buttons and keyboard equivalents:
| Button | Keyboard | Description |
|---|---|---|
|
New |
Alt+n |
For entering a new payment |
|
Edit |
Alt+e |
For editing an existing payment |
|
Save |
Alt+s |
For saving the addition of the new payment or for saving the changes to an existing payment |
|
Save/New |
Alt+w |
This is a combination of the Save and New buttons |
|
Delete |
Alt+d |
To delete a payment |
|
Cancel |
Alt+c |
To cancel adding or editing a payment. Your entries will not be saved |
|
Applications |
Alt+a |
To enter edit or delete invoices for an existing payment |
|
Exit |
Alt+x |
To exit the payment window |
Menu Selections
For general users, the menu selections can and may be restricted by the assigned menu. Also, if Order Entry is not licensed or not installed then the Order Entry menu selections will not be available for any user.
From the Print menu you may select Edit list. See Edit List of Receipts for more information.
From the Options menu you may View batch information if batches are being used in A/R and Post cash receipts if you have permission to post. See Posting Receipts for more information.
Other Options menu selections include:
| Options main menu selection | Sub menu selection | Documentation |
|---|---|---|
|
View accounts receivable |
Customers open items |
|
|
View accounts receivable |
Invoices |
|
|
View accounts receivable |
Invoice history |
|
|
View accounts receivable |
Customer history by date |
|
|
View accounts receivable |
Customer history by doc # |
|
|
View order entry |
Orders |
See O/E user documentation |
|
View order entry |
Full order inquiry |
See O/E user documentation |
|
View order entry |
Orders for an item |
See O/E user documentation |
|
View order entry |
Invoice history by customer |
See O/E user documentation |
|
View order entry |
Invoice history by invoice |
See O/E user documentation |
|
View order entry |
Invoice history by item |
See O/E user documentation |
Character Mode
There is no character mode version of this screen.
From this screen you can work with both new and existing multi payment receipts.
If you are using date controls, the date range (from Control information) displays in the upper right. The receipt date is controlled by this function.
Enter the following information:
Options
This is the number of the customer making the payment Enter a valid customer, or use one of the following options:
|
<F1> |
For the next cash receipt entry on file - character mode only |
|
<SF1> |
For the previous cash receipt entry - character mode only |
|
<F2> |
For the next customer in customer number sequence |
|
<SF2> |
For the previous customer |
|
Blank |
To look up the customer by name rather than by number |
Miscellaneous Customers
Cash receipts from miscellaneous customers are allowed (these customers have numbers beginning with an asterisk and have been described in the Miscellaneous customers section of the Customers chapter). However, you cannot reach such a customer by the option keys; you must enter the number of a valid miscellaneous customer directly into the customer number field. The cursor then moves to the name field (since both the name and the number of miscellaneous customers must be entered whenever they are referenced).
|
Format |
12 characters |
|
Example |
Type 200 |
Options
If you have left the customer number blank, the cursor will move to the name field to permit selection by customer name. Remember that lower-case letters are significant. Enter the customer name, or the leading characters of the name; or use one of the following options:
|
<F2> |
For the next customer on file, in customer name sequence |
|
<SF2> |
For the previous customer |
|
Blank |
To revert to selecting the customer by his number |
|
Format |
25 characters |
|
Example |
(Does not occur in this example because you have already selected the customer by number.) |
Upon selection of a valid customer (by either method), his name appears next to the customer number, and his balance type and terms also display.
This is the date on which the payment was received. It will be used for G/L distributions.
|
Format |
MMDDYY The default is the same date entered on the previous receipt (except for the first cash receipt of the session, when the default is the system date) |
|
Example |
Type 31205 |
You may be warned or stopped against entering a date that is outside the allowed date range. For more information, read about Date Control in the Control information chapter.
Enter the payment code for this receipt.
The choices are determined by what you entered in payment codes found under the CTL menu selection. For entering these codes see the Payment Codes chapter in the System user documentation .
Usually the choices include at least one cash type, one check type and one credit card type. As each pay code may be assigned to a different cash account you could have more than one pay code per type.
This field can only be entered if the payment code is a credit card or check type. If the it is a credit card type the field displays as Last 4 CC #. If it is a check type it displays as Check #.
For a check type enter the check number.
For a credit card type enter the last four digits of the credit card number. If the matching number exists in the token file the program will find it. A token provides a way of accessing credit card information that is not on your computer system, but is at a remote X-charge server. X-Charge, from Accelerated Payment Technologies, is the credit card service required for this feature.
Amount received
This field cannot be entered. It is automatically filled in after you enter the payments in the multi-payment window.
Options
Enter the cash account number, which must be a valid entry in the Cash accounts selection of the System Manager (CTL) module. You may use one of the options:
|
<F1> |
For the next cash account on file |
|
<SF1> |
For the previous cash account |
|
<F2> |
For the default cash account from Control information |
If only one cash account is defined, the <F1> and <SF1> options do not appear.
|
Format |
Your standard account number format as defined in |
|
Example |
Press <F2> |
If you have entered no check number in the Check number field, this field displays as Reference and you may enter any reference note that you want to add. The reference will be printed on A/R statements if you selected Format 2 statements in Control information.
Options
Otherwise, enter the bank route number or use the option:
|
<F2> |
Customer name |
In all cases the field is optional.
|
Format |
25 characters |
|
Example |
Type 125-6992 |
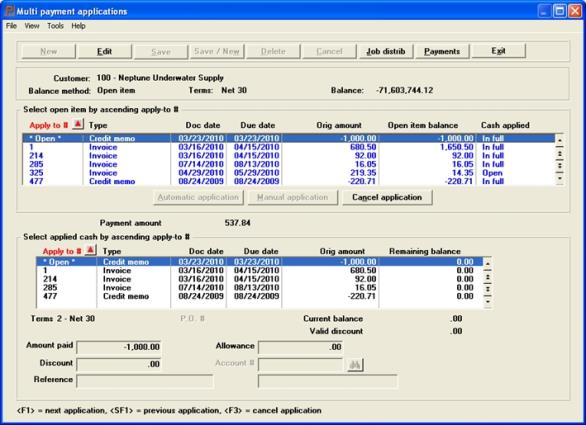
Payment Application List Boxes
Up to 6 existing open invoices display in the upper list box. You may sort the open invoices by apply-to number in ascending or descending order. Click the arrow to the right of the column name to change the sort or use the View menu options. Only Red fields may be sorted.
To locate a open invoice, you may start typing the apply-to number. Use may also use the up/down arrows, Page up, Page down, Home and End keys to locate the open invoices.
The lower list box can display up to 6 applied invoices. You may sort the applied invoices by apply-to number in ascending or descending order
You may select the Automatic application button to apply the selected invoice automatically. The amount remaining field will decrease by the amount of the transaction that you are applying.
You may select the Manual application button to apply a partial amount to the selected invoice. When you select Manual application, then the cursor moves to the Amount paid field.
You may cancel any application that has been applied. As soon as the application is canceled, then the Amount remaining field will increase by the amount that was canceled.
Select the Payments button when you are finished applying invoices. See Payments.
Credit Card Type Payment
Payment amount
This displays the total of the open item invoices that have been applied for the payment. The total amount you apply may be any amount.
Enter the amount to be paid on the open item, or use the following option:
|
<F2> |
To calculate the amount automatically, taking any valid discount for this item but not entering any allowance. If the amount is insufficient to pay the item in full, it is paid in part. A partially-paid item is not discounted. |
|
Format |
999,999,999,999.99- |
|
Example |
Press <Enter> |
If you pressed <F2> in the previous field, the discount is applied automatically and the focus does not move to this field. Otherwise, enter the discount to take on the open item.
|
Format |
999,999,999,999.99- |
|
Example |
Not applicable in this example. |
You may enter a reference for this cash application. This reference will appear on the customer’s statement if you are using Format 2 statements.
|
Format |
25 characters |
|
Example |
Press <Enter> to leave the reference blank. |
If you pressed <F2> in the Amount paid field, a zero allowance is assumed and the cursor does not move to this field. Otherwise, enter the allowance as described.
|
Format |
999,999,999,999.99- |
|
Example |
Not applicable in this example. |
If you entered an allowance amount, then you must enter the account for the allowance.
|
Format |
Your standard account number format, as defined in |
|
Example |
Not applicable in this example. |
The functions payments differ if the pay type is a credit card vs. a check, cash or on account. There are differences if it is a new credit card number with no existing token or if the credit card token already exists.
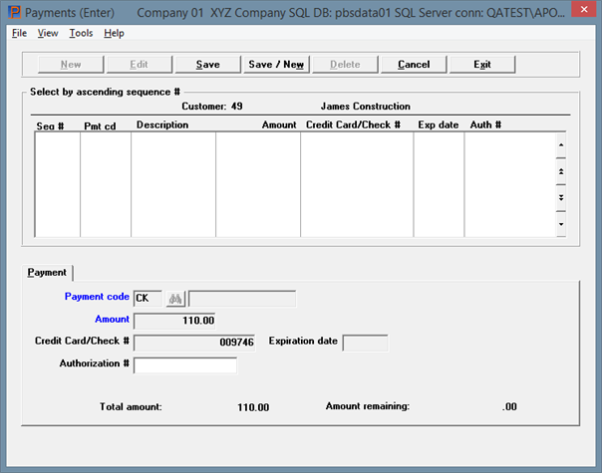
If it is a credit card or cash type, after selecting the Payments button a screen like the following displays:
When it is a credit card type payment the token screen displays. When there is no existing token the screen looks similar to this:
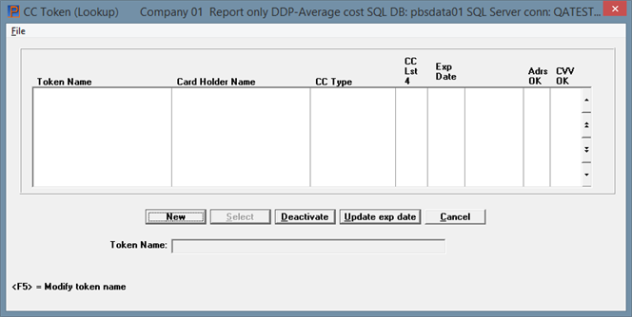
Use this screen for entering a new credit card token, and if available, for selecting an existing token.
If there is an existing token use the Select button is available. If it is the correct credit card click on it to pay the cash receipt. After clicking on the Select button communication with the X-Charge server occurs. A message displays indicating Calling X-Charge, please wait. This may take a few seconds. When finished the credit card payment has been applied to the selected invoices.
If there is no existing token for the customer you will be immediately prompted to enter a new one.
If the customer is paying with a different credit card you will have to enter a new token. Select the New button.
When entering a new token the following screen displays:
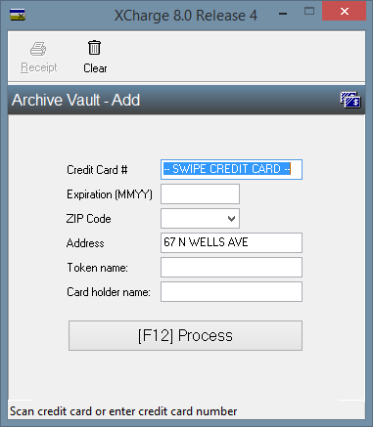
Fill in all the fields.
Enter the credit card number as it appears on the card.
The address field is automatically filled in from the customer's address 1 field. You may change it. You must enter the zip code.
The Token name can be the company name, company number or any way to identify the token the next time it is being used. For security reasons it is recommended that you do NOT enter the credit card number and expiration date as part of the Token name.
The card holder name is the name as printed on the card.
After selecting the (F12) Process button the following screen displays:
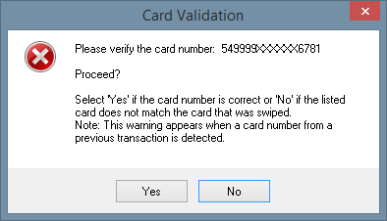
If the card is approved the following screen displays:
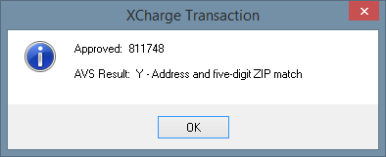
At this point the token is stored in PBS. The data matching the token is store at the X-Charge server. The following screen displays:
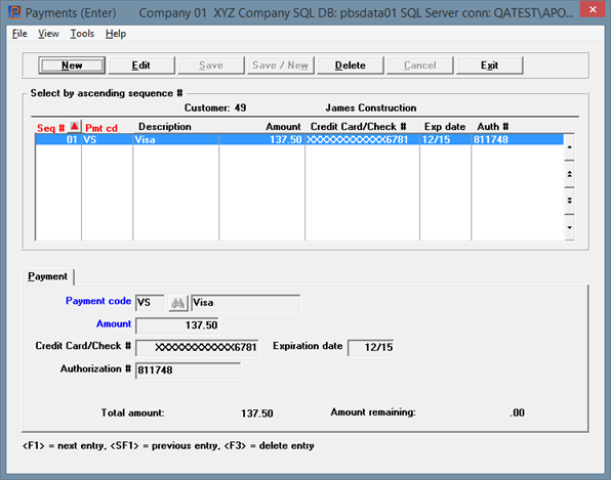
Select the exit button to when finished applying the cash receipt. If the amount remaining is not zero, then the message "An amount remains to distribute - do you want to delete the entire entry ?". If you select yes, then the cash receipt is deleted. If you select No, then you can return to the screen to complete the cash applications.
Amount Remaining
When the amount remaining is zero, you may exit the screen. If you are interfaced with Job Cost, then the question "Distribute to jobs ? displays. Select Yes to distribute to a job or No to complete the application.
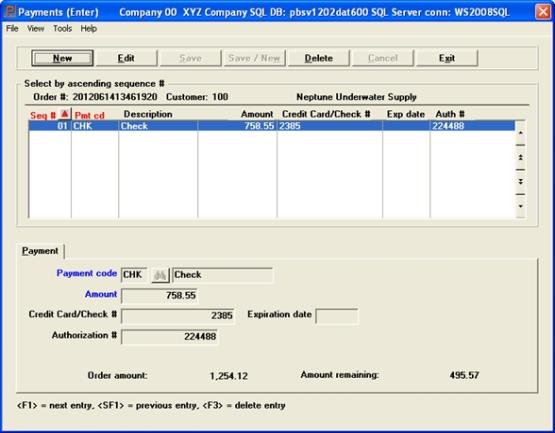
There are two display-only fields.
Payment code
This is the payment code that was entered on the first screen.
Amount
This is the total amount of the open item invoices that have been applied.
Credit Card/Check #
If you are paying by credit card, the credit card payment window opens. When finished with the credit card processing this field is automatically entered.
If paying a check type, then this is the same number entered from the first screen.
Expiration date
If you are paying by credit card, the credit card payment window opens. When finished with the credit card processing this field is automatically entered.
This field can only be entered if you are paying by check.
If you are paying by credit card the credit card payment window opens. When finished with the credit card processing this field is automatically entered.
After you have finished entering the payments select the exit button.
Credit Card Processing
This is an example of the X-charge credit card payment window for entering a Pre-Authorization:
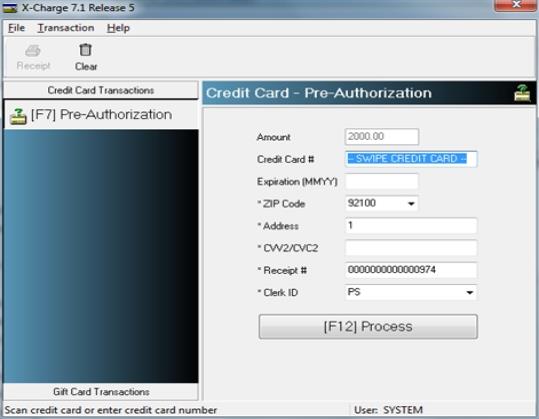
After swiping the card number or entering it manually and selecting Process, an Approved message displays with the authorization number.
You are returned back to the multi-payment window for reviewing the payment.
This selection lets you examine your cash receipts before posting them (to obtain a list of cash receipts after they have been posted, use the Cash History Report).
See a sample Cash Receipts Edit List in the Sample Reports appendix.
Select
Edit list from the Cash receipts menu.
The Cash Receipts Edit List will be printed. No selection screen appears as all entries are printed unconditionally. You may be asked to select a printer or to adjust alignment; refer to the Starting PBS, Menus and Printing chapter of the System User documentation.
Once you have examined the Cash Receipts Edit List and verified that all cash receipts are correct, you can post them to the A/R master files / tables. Until they are posted, the cash receipts can be changed at will; once posted they become a permanent record.
Select
Post from the Cash receipts menu or from the graphical mode screen select Post from the Options menu.
The Cash Receipts Journal prints. You may be asked to select a printer or to adjust alignment; refer to the Starting PBS, Menus and Printing chapter of the System User documentation. Except for the title, the Journal is identical to the Edit List appearing at the end of this chapter.
Once the journal is printed, the cash receipts are posted to A/R Open Items, the customers and distributions are updated as illustrated here:
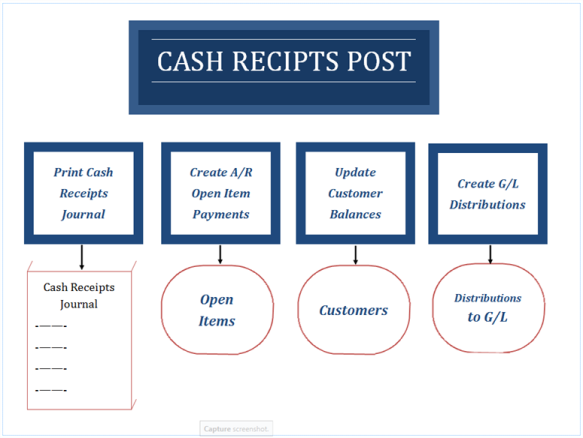
If you are in a multi-user environment and do not use batch controls, other users cannot enter cash receipts while you are posting, nor can two users post cash receipts simultaneously.
See a sample Cash Receipts Journal in the Sample Reports appendix.
|
Example |
Post the cash receipts from examples entered earlier in this chapter. |
Posting to jobs (Job Cost interfaced)
If you are also using the Passport Business Solutions Job Cost, and you have applied any payments to jobs, these will also be posted to the jobs by the Post selection.
The accounts receivable account will be credited by the full amount paid on jobs, even if there is some retainage being paid.
The retainage receivable account should already have been credited in the Miscellaneous charges selection. For an explanation of how to credit the retainage receivable account, refer to the important note in the Posting Job Distributions section at the end of the Miscellaneous Charges chapter.
This selection helps you to apply cash by providing a worksheet of the outstanding items for the customers you are currently interested in.
The cash application worksheet is printed with the open invoices grouped by customer.
Select
Cash application worksheet from the Cash receipts menu.
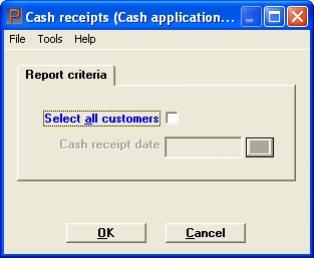
The following screen appears:
Graphical Mode
Character Mode
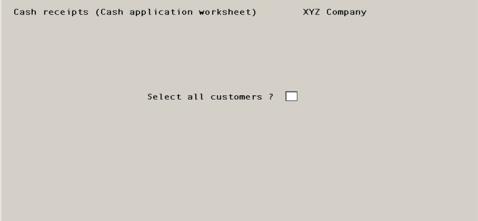
Enter information as follows:
If you answer Y, worksheets will be printed for all customers from whom you received a payment by a specified date (to be entered in the next field).
If you answer N, you can then select individual customers (and dates) to be included on the worksheet.
|
Format |
One letter, either Y or N. There is no default. |
|
Example |
Type N |
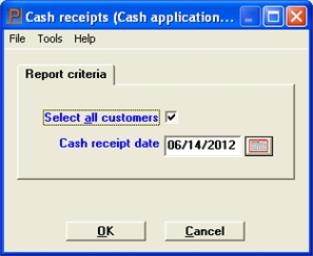
If you answered Y, the following screen appears:
Graphical Mode
Character Mode
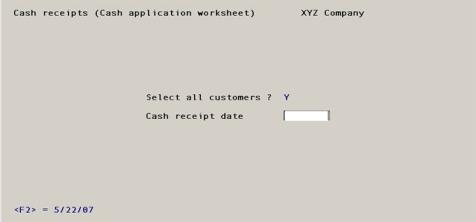
Enter information as follows:
Options
Enter the payment receipt date for which you want information, or use the option:
|
<F2> |
For the system date |
|
Format |
MMDDYY |
|
Example |
(This field does not appear in this example because not all customers were selected.) |
Any change ?
Answer Y to re-enter the screen, or N to print the Cash Application Worksheet.
This lets you print a worksheet for a single customer or for selected customers. You may enter this screen repeatedly to select multiple customers the worksheet will not print until you indicate you have finished selecting customers. The dates may be different for each customer.
Customers can be entered in any order, but the report will be printed in customer sequence anyway. A single entry consists of both a customer and a date; there is a limit of fifty entries for any one worksheet.
A customer may be unselected if you decide you do not need a worksheet for him after all.
Once you begin selecting customers, you must continue doing so until you either print the worksheet or abandon the attempt. That is, you cannot select a few customers, exit this selection to do something else, then come back later expecting to find those customers still selected.
Once a worksheet has printed, all customers are automatically unselected.
If you are in a multi-user environment, multiple users can be using this selection at the same time. Each operator’s list of selected customers is specific to that operator.
The following screen appears:
Graphical Mode
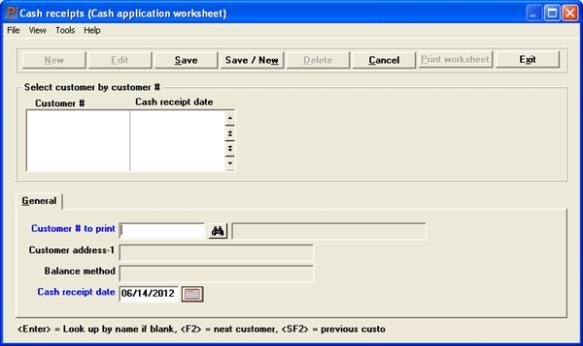
Customers List Box
Up to 6 existing customers display in the list box. You may sort the cash receipts by customer number in ascending or descending order. Only column names in red may be sorted. To select or change the sort field, click on the column name or the arrow to the right of the column name or use the View options.
To locate a cash receipt, start typing the customer number or use the arrow keys, <PgDn>/<PgUp>, and <Home>/<End> keys to find the customer. The <F1> and <SF1> keys function the same as the up/down arrow keys.
Customers that display in the list box are available for changes or deletion. The fields for the selected customer display in the lower part of the screen.
When a customer is found, you may select the <Enter> key or Edit button to start editing.
You have the following options with the buttons and keyboard equivalents:
| Button | Keyboard | Description |
|---|---|---|
|
Alt+n |
For entering a new customer |
|
|
Alt+e |
For editing an existing customer |
|
|
Alt+s |
For saving the addition of the new customer or for saving the changes to an existing customer |
|
|
Alt+w |
This is a combination of the Save and New buttons |
|
|
Alt+d |
To delete a customer |
|
|
Alt+c |
To cancel adding or editing a customer. Your entries will not be saved |
|
|
Alt+p |
To print a worksheet of listing open items for each selected customer up to this cut-off date. |
|
|
Alt+x |
To exit the cash receipt window |
Character Mode
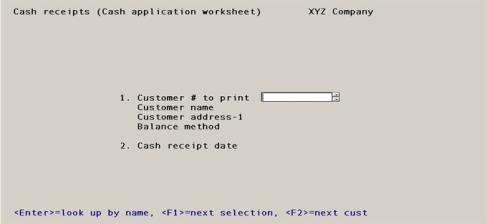
Enter the following information:
Enter the customer for whom to print a worksheet, leave the field blank to look up a customer by name, or use one of the options:
|
<F1> |
For the next selected customer |
|
<SF1> |
For the previous selection |
|
<F2> |
For the next customer on file, whether selected or not |
|
<SF2> |
For the previous customer on file |
|
<Esc> |
To stop selecting customers. If no customers are selected at this point, you are returned to the previous screen; otherwise you can either print the worksheet or unselect all customers selected so far. |
Although the worksheet is primarily used for open-item customers, a balance-forward customer may be entered.
|
Format |
12 characters |
|
Example |
Type 200 |
Customer name
Customer address-1
Balance method
These fields are informational only and display automatically upon selection of a customer. You may not enter anything in them, except that the name field is used when selecting a customer by name as described above.
This is the date that payment was received from this customer. A worksheet will be printed listing open items for each selected customer, up to this cut-off date.
Enter the date, or use the option:
|
<F2> |
For the system date |
|
Format |
MMDDYY |
|
Example |
Type 31215 |
Field number to change ?
Make any needed changes to this entry. For an existing selection, you may also use one of the options:
|
<F1> |
For the next entry among those you have already entered |
|
<SF1> |
For the previous entry among those you have already entered |
|
<F3> |
To delete this entry (i.e., to unselect this customer) |
OK to proceed with selected customers ?
You are asked this question upon pressing <Esc> from Field #1. Answer Y to print the worksheets, or N to reconsider.
Delete all selections and begin again ?
You are asked this question if you answered N to the preceding. If you answer Y the program forgets all your previous entries and returns you to Field #1; if you answer N your entries are retained and you are returned to Field #1 to enter more.